4. The No-Code Flow Editor
The editor is a web page where you build a pipeline by connecting nodes (an input, one or more AI tasks, an output) and watch the results live. It runs in a web browser, on your PC or on any other computer that can reach the board, and sends the pipeline to the AI server on the board. You can change the pipeline as often as you like: the board never needs a restart.
Requirements
- Python 3.8 or newer, only to serve the editor's files to the browser.
- Chrome or Firefox.
Download and start
On your PC, Linux / macOS:
pc$ mkdir -p ~/musebox && cd ~/musebox
pc$ curl -LO https://s3.eu-central-1.wasabisys.com/musebox/SDK-RELEASES/NO_CODE_FLOW_EDITOR/download_and_run.sh
pc$ bash download_and_run.sh
The script downloads the editor into ~/musebox/no-code-flow-editor and serves it at http://127.0.0.1:8000.
Open that address in Chrome or Firefox. Leave the terminal open: the editor works as long as it runs. To
stop the editor, press Ctrl+C in that terminal on your PC. It does not install Python: if Python is missing, it stops and
asks you to install it. On Debian / Ubuntu it installs unzip and curl if they are missing (it asks for
your sudo password).
The next times, start it on your PC without downloading again:
pc$ cd ~/musebox/no-code-flow-editor
pc$ python3 serve.py
All the options of serve.py (--help)
usage: serve.py [-h] [--port PORT] [--bind BIND]

Serve the MuseBox No-Code Flow Editor

options:
  -h, --help   show this help message and exit
  --port PORT  port (default: 8000)
  --bind BIND  address to listen on (default: 127.0.0.1)
On Windows 10 / 11 the script does not run. Instead, on your PC:
- Install Python from python.org (or the Microsoft Store). In the
python.org installer, tick Add python.exe to PATH on the first screen: otherwise the
pythoncommands of this documentation are not found. - Download no-code-flow-editor-latest.zip,
create the folder
C:\Users\<your-user>\musebox, and extract the zip there (right-click → Extract All, and set the destination toC:\Users\<your-user>\musebox, not the folder Windows suggests). You should then haveC:\Users\<your-user>\musebox\no-code-flow-editor\serve.py. - In Command Prompt or PowerShell, start it from the editor folder:
pc$ cd C:\Users\<your-user>\musebox\no-code-flow-editor
pc$ python serve.py
- Open http://127.0.0.1:8000 in Chrome or Firefox. Leave the terminal open: the editor works as long as it runs. To stop the editor, press Ctrl+C in that Command Prompt or PowerShell window.
The next times, run only step 3.
Update
When a newer version of the editor is available, an Update to vX.Y.Z button appears in the top bar, next to
the version number (the PC needs internet). Click it and confirm: the new version is downloaded, checked and
installed, then the page reloads. Your graph, your saved configs and your own files in the editor folder stay; the
replaced files are kept in no-code-flow-editor/.musebox-previous/.
If a message asks you to restart the editor: in the terminal on your PC where serve.py (or
download_and_run.sh) runs, press Ctrl+C, then start python3 serve.py (python serve.py on Windows) again
in the same terminal. The page in the browser stays open: reload it.
The button needs the editor started with serve.py, as above, and version 1.5.0 or newer: an older version
has no button, so download it once more as described above.
Your first pipeline: face detection on the PC webcam
Make sure the AI server is running on the board (chapter 3).
Everything happens in the browser, on the editor page (http://127.0.0.1:8000, opened above). The big grid that fills the page is the canvas, where the pipeline is built. To add a node, right-click on an empty part of the canvas and choose Add Node. To connect two nodes, drag from an output (right side of a node) to an input (left side of the next one).
- The canvas already has a configuration node. If it is not there (for example you deleted it), add it again: right-click on the canvas → Add Node → MuseBox Configuration → configuration. In it:
- URL:
ws://<board-ip>:8080 - Board:
Mercury+ PE3 Hailo - click Connect / Reconnect.
The node shows ● CONNECTED in green, and the node menu shows only the tasks this board supports. If
it does not connect, check that the AI server is running and that http://<board-ip>:8080/models opens
in the browser.
- MuseBox Input → PC webcam. Adding the node does not open the webcam yet: the browser asks for it only when the pipeline runs (step 5).
- MuseBox Tasks → Face Analysis → Face Detection: connect the webcam output to its
frameinput. - MuseBox Output → Image Rendering: connect the
post processoutput of Face Detection to it. - Press Play in the toolbar. Only now the editor opens the webcam, so only now the browser asks
permission to use it (in Chrome and Firefox, a pop-up next to the address bar): click Allow. The
browser remembers the choice for
http://127.0.0.1:8000, so it does not ask again.
The faces appear boxed in the Image Rendering node. Step runs a single frame (the first time it also opens the webcam and asks for the permission).
If no pop-up appears after Play and the image stays empty, the permission was refused earlier: click the camera icon in the address bar, allow the camera for this page and reload it.
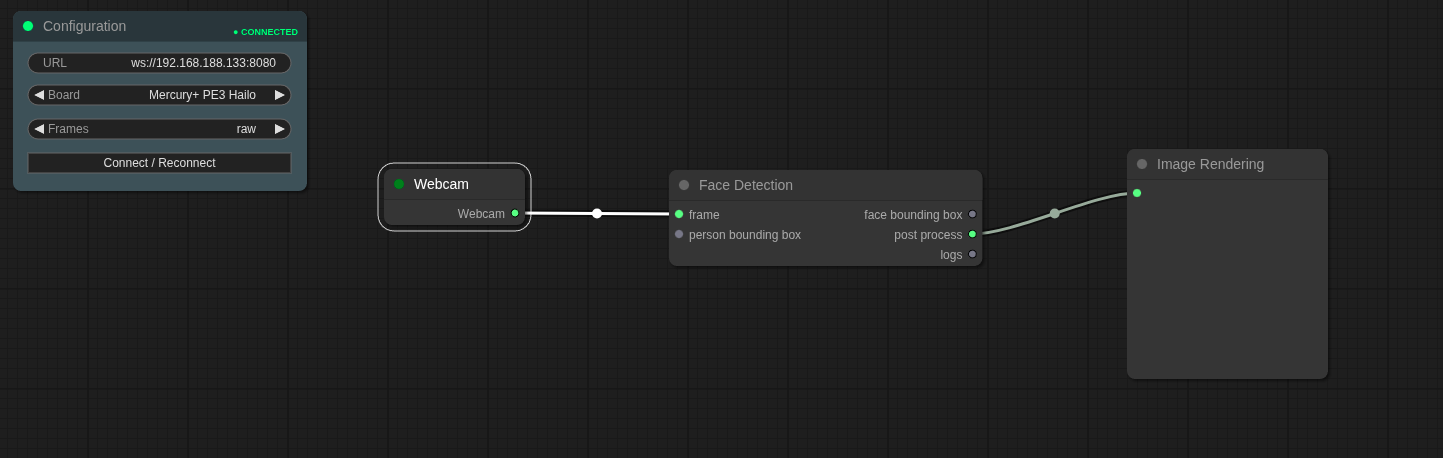
The same pipeline is also among the samples (Manage → Sample pipelines → Face detection). After
loading it, set the board's address in the configuration node and click Connect / Reconnect, check that
the PC webcam output is connected to the frame input of Face Detection (connect it if not), and
press Play: the browser asks permission to use the webcam at this moment, as in step 5 above.
Chaining tasks
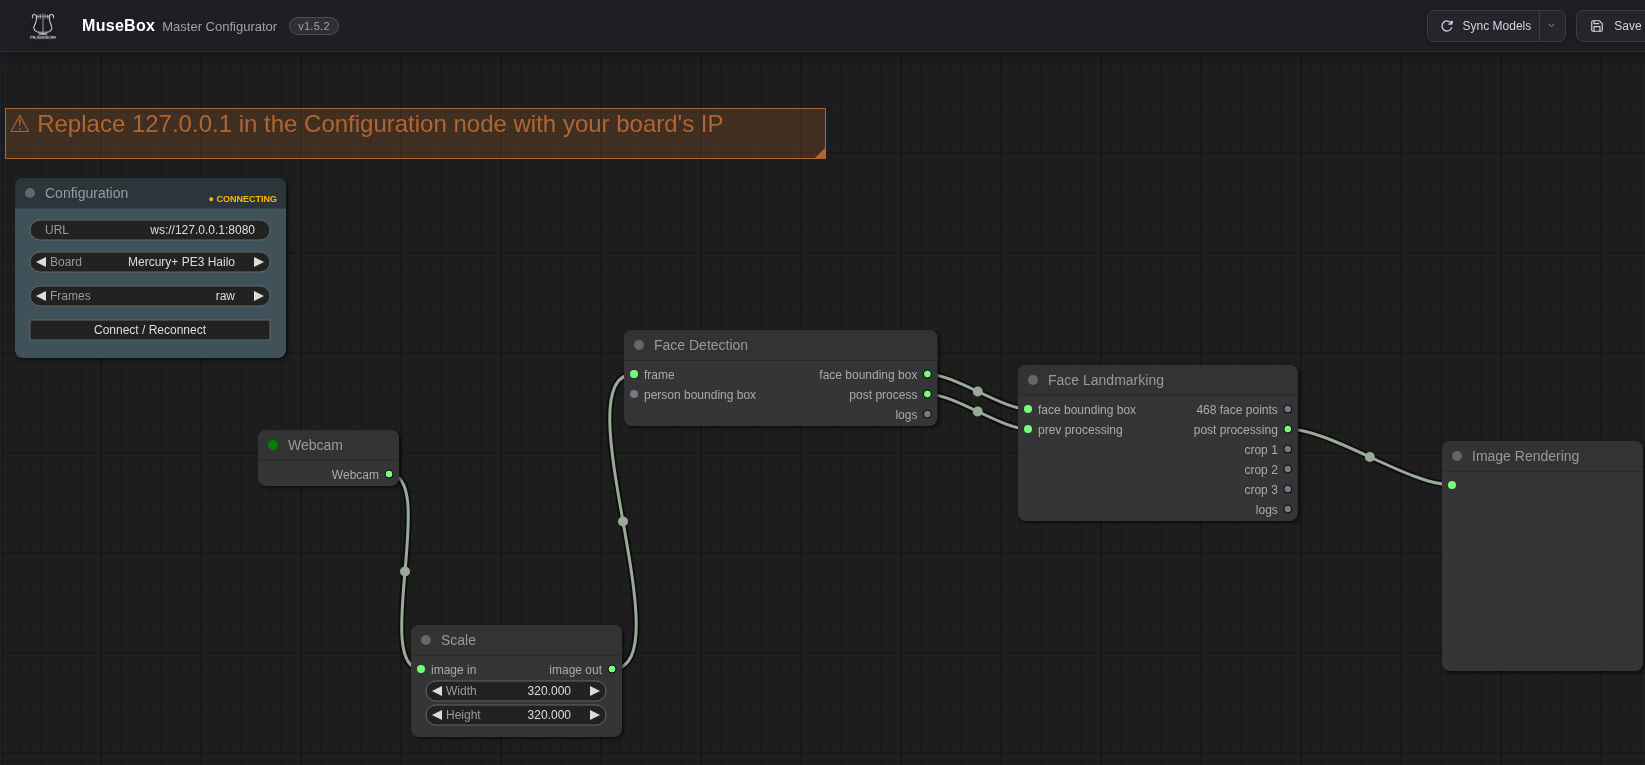
The tasks that work on a face take a face bounding box input, and the server analyses each face that Face Detection found. On the Mercury+ PE3 Hailo-8 they are Face Landmarking, Face Recognition and Add Face to DB. To chain one after Face Detection:
- connect the
face bounding boxoutput of Face Detection to itsface bounding boxinput; - connect the
post processoutput of Face Detection to itsprev processinginput (the image to draw on); - connect its
post processingoutput to Image Rendering.
Manage → Sample pipelines → Face landmarks has this pipeline ready.
Other useful nodes:
| Node | Use |
|---|---|
| MuseBox Operators → Scale | resize the frames before sending them (faster, less precise) |
| MuseBox Operators → Count Bounding Boxes | how many faces / objects are in the frame |
| MuseBox Operators → True Threshold | gives yes only after its input has been yes (or a number greater than zero) for a number of frames in a row |
| MuseBox Output → Top 5, Debug Print | show the results as text |
| MuseBox Output → Run Python Script, Play Audio | act on a trigger |
| MuseBox Input → MP4 Video File | run on a video instead of the webcam |
Which output goes into which input
Every input and output has a type, and the editor connects an output only to an input of the same type: while you drag a link, the inputs that accept it stay highlighted, and if you drop it on another input nothing is connected. Debug Print accepts any output.
The tables list the nodes of the Mercury+ PE3 Hailo-8. Image outputs are the outputs that carry a
picture: the output of PC webcam, MP4 Video File and Board Camera, post process / post processing and
crop 1/2/3 of the tasks, and image out of Scale.
Input nodes (MuseBox Input)
| Node | Output: connect it to |
|---|---|
| PC webcam, MP4 Video File, Board Camera | frame of Face Detection, Object Detection, CasViT Classification, Monocular Depth, Semantic Segmentation; prev processing of the face tasks; image in of Scale; Image Rendering; both inputs of Custom Model |
Tasks that take the whole frame (Face Detection, Object Detection, CasViT Classification, Monocular Depth, Semantic Segmentation)
| Slot | Kind | Connect |
|---|---|---|
frame |
input | an input node (PC webcam, MP4 Video File, Board Camera) or image out of Scale; not the post process of another task |
person bounding box (Face Detection) |
input | leave it unconnected: no node of this board produces it |
face bounding box (Face Detection) |
output | face bounding box of Face Landmarking, Face Recognition, Add Face to DB; Count Bounding Boxes; first input of Custom Model |
object bounding box (Object Detection) |
output | Count Bounding Boxes; first input of Custom Model; Debug Print |
predictions (CasViT) |
output | Top 5; Debug Print; first input of Custom Model |
top label (CasViT) |
output | Debug Print |
post process |
output | Image Rendering; prev processing of the next task; image in of Scale |
logs |
output | Debug Print (the server's answer, in JSON) |
Tasks that work on each face (Face Landmarking, Face Recognition, Add Face to DB)
| Slot | Kind | Connect |
|---|---|---|
face bounding box |
input | face bounding box of Face Detection |
prev processing |
input | the image to draw the results on: post process of Face Detection, or post processing of the previous face task to draw everything on one image |
468 face points (Face Landmarking) |
output | Debug Print |
label (Face Recognition) |
output | Debug Print |
status (Add Face to DB) |
output | Debug Print |
post processing |
output | Image Rendering; prev processing of the next face task |
crop 1, crop 2, crop 3 (Face Landmarking) |
output | Image Rendering (the first three faces, cut out) |
logs |
output | Debug Print |
Operators (MuseBox Operators)
| Node | Input: connect | Output: connect to |
|---|---|---|
| Scale | image in: any image output |
image out: frame of a task, prev processing, Image Rendering |
| Count Bounding Boxes | bounding box: face bounding box of Face Detection or object bounding box of Object Detection |
result (a number): True Threshold, Play Audio, Debug Print |
| True Threshold | in: a number (result of Count Bounding Boxes) |
out (yes/no): Run Python Script, Play Audio |
Outputs (MuseBox Output)
| Node | Input: connect |
|---|---|
| Image Rendering | any image output |
| Debug Print | any output |
| Top 5 | predictions of CasViT Classification, or predictions / data of Custom Model |
| Play Audio | a number or yes/no output (result of Count Bounding Boxes, out of True Threshold): it plays when the value becomes greater than zero or yes |
| Run Python Script | out of True Threshold |
Your models (the nodes added by Sync Models, or MuseBox Tasks → Custom → Custom Model; see chapter 6)
| Slot | Kind | Connect |
|---|---|---|
frame / bounding box |
input | an image output; or a bounding box output (face bounding box, object bounding box) to run the model on each box; or predictions of another model |
prev processing |
input | the image to draw on: any image output |
predictions / data |
output | Top 5; Debug Print; first input of another model |
post process |
output | Image Rendering; prev processing of the next task |
logs |
output | Debug Print |
Using the board camera
Replace PC webcam with MuseBox Input → Board Camera. The camera must be enabled on the board (chapter 3).
| Mode | How it works |
|---|---|
grab |
the browser asks the board for one frame at a time; every task node sends its own request |
stream |
the board runs the whole pipeline itself and only sends the results: the fastest mode |
Preview max side is the size of the image shown in the browser (default 320 px). A bigger preview is sharper but slower.
Saving a pipeline
- Save stores the current pipeline in the browser under a name.
- Manage lists the saved pipelines. From there you can load, delete or export them to a
.jsonfile, or import one. export downloads the pipeline into your browser's Downloads folder, as<name>.json(the name you saved it with).
- Manage → Sample pipelines loads one of the ready-made pipelines that come with the editor (face
detection, landmarks and recognition, adding a face, object detection, depth, segmentation, classification). They use
ws://127.0.0.1:8080: set your board's IP address in the Configuration node, then Save to keep it.
The exported .json is what the MuseBox Client runs (chapter 5), and it is the same file
mbx-compile pipeline generates for your models (chapter 6).
Network statistics
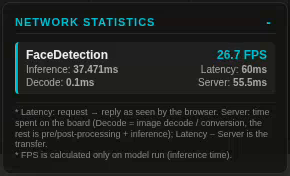
The Network Statistics panel, at the bottom right of the editor while a pipeline runs, shows for each task:
- the inference time on the board;
- the total time seen by the browser.
The difference between the two is the time spent sending the image over the network. Use a wired connection for the best speed.