Tutorial: age and gender (TFLite)
This tutorial takes a TensorFlow Lite model that estimates the age and gender of a face and runs it on the board's CPU, after the built-in face detection:
webcam ─► Face Detection (Hailo NPU) ─► each face ─► age_gender (CPU) ─► age and gender on screen
On the way you will see how to:
- inspect a
.tflitemodel; - add your own C++ pre- and post-processing to a package;
- copy the package to the board;
- build a cascaded pipeline, where a second model works on the faces found by the first.
All the files are in musebox-compiler/examples/age_gender_tflite/:
| File | What it is |
|---|---|
age_gender.tflite |
the model, quantized to 8 bits |
preprocess.cpp |
prepares each face for the model |
postprocess.cpp |
turns the two outputs of the model into an age and a gender |
manifest.json, labels.txt |
a finished package, the result of step 3 (labels.txt is only a comment: this model has no class names) |
age_gender_cascaded_pipeline.json |
a finished pipeline, the result of step 6 |
The steps below rebuild the package from the .tflite file, as you will do with your own model.
Before you start
- The MuseBox Compiler is installed on the PC (chapter 6).
- The AI server runs on the board (chapter 3), and
ssh root@<board-ip>works from the PC. - The No-Code Flow Editor (chapter 4) or the MuseBox Client (chapter 5) is ready on the PC.
Work in the example folder, with the compiler's venv active (in every new terminal):
On your PC, Linux / macOS:
pc$ cd ~/musebox/musebox-compiler/examples/age_gender_tflite
pc$ source ~/musebox/musebox-compiler/.venv/bin/activate
On your PC, Windows 10 / 11 (Command Prompt or PowerShell):
pc$ cd C:\Users\<your-user>\musebox\musebox-compiler\examples\age_gender_tflite
pc$ C:\Users\<your-user>\musebox\musebox-compiler\.venv\Scripts\activate
1. Look inside the model
On your PC:
pc$ mbx-compile inspect-cpu age_gender.tflite
{
  "source": "ai_edge_litert",
  "backend": "tflite",
  "inputs": [
    {
      "name": "serving_default_data:0",
      "shape": [1, 62, 62, 3],
      "data_type": "INT8",
      "format": "RGB",
      "quantization": {"scale": [1.0], "zero_point": [-128]}
    }
  ],
  "outputs": [
    {"name": "StatefulPartitionedCall:0", "shape": [1, 1, 1, 1], "data_type": "INT8"},
    {"name": "StatefulPartitionedCall:1", "shape": [1, 1, 1, 2], "data_type": "INT8"}
  ]
}
What this tells you:
- Input: a 62 × 62 RGB image, 8 bits per channel. The AI server passes the pixels to the model as they are, so no normalization is needed.
- Output 0: one value, the age.
- Output 1: two values, the scores for female and male.
None of the built-in tasks returns an age and a gender, so the package uses the task custom with its own
postprocess.cpp.
Warning
If "source" says "fallback", the compiler could not read the model (LiteRT is missing on this PC,
see chapter 6) and the numbers shown are placeholders, not your
model's.
2. The pre- and post-processing code
Both files use the functions and types described in Custom pre- and post-processing.
preprocess.cpp
The model receives one face at a time (step 6 explains how). preprocess.cpp scales the face so that it
covers 62 × 62 without being stretched, cuts out the centre, and converts it to RGB:
// Aspect-ratio preserving center crop to 62x62
float scale = std::max(static_cast<float>(target_w) / frame_w, static_cast<float>(target_h) / frame_h);
int new_w = static_cast<int>(std::round(frame_w * scale));
int new_h = static_cast<int>(std::round(frame_h * scale));

cv::Mat resized;
cv::resize(frame, resized, cv::Size(new_w, new_h), 0, 0, cv::INTER_LINEAR);

int x = (new_w - target_w) / 2;
int y = (new_h - target_h) / 2;
cv::Mat crop = resized(cv::Rect(x, y, target_w, target_h)).clone();

if (color_fmt == "RGB") {
    cv::cvtColor(crop, crop, cv::COLOR_BGR2RGB);
}
target_w, target_h (62 × 62) and color_fmt ("RGB") come from manifest.json.
postprocess.cpp
The model has two outputs. postprocess.cpp recognises them by their size, turns them into real numbers
with musebox::dequantize, and returns named fields:
float uncertainty_thresh = request_msg.value("uncertainty_threshold", 0.1f);

for (const auto& [name, out] : raw_outputs) {
    std::vector<float> values;
    musebox::dequantize(out, values);

    if (values.size() == 1) {
        // Age head: normalized scalar [0, 1] scaled by 100 to years [0, 100]
        age = std::max(0, static_cast<int>(std::round(values[0] * 100.0f)));
    } else if (values.size() == 2) {
        // Gender head: index 0 = female, index 1 = male
        float female_p = values[0];
        float male_p   = values[1];
        float diff     = std::abs(female_p - male_p);

        if (diff < uncertainty_thresh) {
            gender = "uncertain";
            gender_conf = std::max(female_p, male_p);
        } else if (female_p > male_p) {
            gender = "female";
            gender_conf = female_p;
        } else {
            gender = "male";
            gender_conf = male_p;
        }
    }
}

return {
    {"task", "age_gender"},
    {"age", age},
    {"gender", gender},
    {"gender_confidence", std::round(gender_conf * 10000.0f) / 10000.0f},
    {"custom_cpp", true},
    {"input_meta", {
        {"orig_w", meta.orig_w},
        {"orig_h", meta.orig_h}
    }}
};
When the two gender scores differ by less than 0.1, the gender is "uncertain". A client can change
this limit by adding "uncertainty_threshold" to its request.
3. Create the package
On your PC:
pc$ mbx-compile init --model age_gender.tflite --name age_gender --task custom --num-threads 4 --preprocess preprocess.cpp --postprocess postprocess.cpp
[MuseBox] Copied model file to age_gender/age_gender.tflite
[MuseBox] Analyzing tensors for age_gender.tflite (backend=tflite)...
[MuseBox] Copied custom preprocessor to age_gender/preprocess.cpp
[MuseBox] Copied custom postprocessor to age_gender/postprocess.cpp
[MuseBox] Created manifest at age_gender/manifest.json
[MuseBox] Created placeholder labels file at age_gender/labels.txt

[Success] Model package initialized at: age_gender/
The compiler reads the input size, the colour order and the data type from the model, so --input-shape
and --format are not needed here. Check that input.shape in age_gender/manifest.json is
[1, 62, 62, 3]: if it is [1, 224, 224, 3], the compiler could not read the model (the .tflite reader is
missing, see chapter 6) and wrote placeholder values without any error. --num-threads 4 lets the model use four CPU cores.
The new folder age_gender/ holds the package. The important parts of its manifest.json:
{
  "model_name": "age_gender",
  "task_type": "custom",
  "backend": "tflite",
  "tflite_file": "age_gender.tflite",
  "input": {
    "shape": [1, 62, 62, 3],
    "format": "RGB",
    "data_type": "INT8"
  },
  "preprocessing": {"type": "custom", "script": "preprocess.cpp"},
  "postprocessing": {"type": "custom", "script": "postprocess.cpp", "labels_file": "labels.txt"},
  "runtime": {"backend": "tflite", "num_threads": 4}
}
labels.txt holds only a comment line: this model has no class names, and postprocess.cpp writes the
labels itself.
The package specification describes every field.
4. Check and package
On your PC:
pc$ mbx-compile verify age_gender/
pc$ mbx-compile package age_gender/ -o age_gender.mbx
[PASSED] Package 'age_gender' is valid and ready for deployment!
[Success] Created package: .../age_gender.mbx
age_gender.mbx contains the model, the manifest, the labels, the two .cpp files and
musebox_plugin.hpp, which the board needs to compile them.
5. Copy it to the board
On your PC:
pc$ mbx-compile deploy age_gender.mbx --remote root@<board-ip> --dest /root/musebox-ai-servers/ai_models
Steps 1 to 5 on the PC:
The package is unpacked into /root/musebox-ai-servers/ai_models/age_gender/ on the board.
Restart the AI server on the board. If the server runs in an ssh terminal, press Ctrl+C in that terminal;
if you started it in the background (chapter 3), run pkill -f musebox-ai-server on the board
(pkill -f musebox_ai for the Python server). Then start it again with the commands below. Keep
running the pc$ commands in a separate terminal on your PC.
On the board:
board$ cd /root/musebox-ai-servers
board$ ./musebox-ai-server-cpp/musebox-ai-server
The first start after a deploy compiles the two .cpp files: about one or two minutes for each file, and
the server answers only when it has finished. Among the start-up
messages (each starts with the date and time) you should see:
[PackageLoader] Auto-compiling native C++ plugin: .../preprocess.cpp -> .../preprocess.so
[PackageLoader] Successfully compiled: .../preprocess.so
[PackageLoader] Auto-compiling native C++ plugin: .../postprocess.cpp -> .../postprocess.so
[PackageLoader] Successfully compiled: .../postprocess.so
Loaded custom C++ preprocess plugin from: .../preprocess.so
Loaded custom C++ postprocess plugin from: .../postprocess.so
Open http://<board-ip>:8080/models in the browser. The list now contains age_gender, with
"has_custom_preprocess": true and "has_custom_postprocess": true.
The restart on the board, with the two plugins compiled (the wait is cut):
If you see Compilation failed for ... instead, the model runs without your code. See
Compile and run.
6. Build the cascaded pipeline
In a cascaded pipeline, Face Detection finds the faces in each frame and the age_gender node
receives their bounding boxes. For each face, the editor or the client cuts the face out of the frame and
sends only that image to age_gender. With the board camera, it sends only the box, and the board cuts out
the face itself.
Build it in the editor with Sync Models (option A), or let the compiler write it for you (option B).
Face Detection sends two things to the age and gender node: the face boxes, and its own output image (with the faces boxed), on which the age and gender are written.
Option A: build it in the editor with Sync Models
- In the configuration node already on the canvas (add it from MuseBox Configuration → configuration
if it is missing), set URL to
ws://<board-ip>:8080and click Connect / Reconnect. - Click Sync Models in the toolbar. The editor asks the board for its models and adds a node for each
custom model (the built-in tasks are already in the menu):
age_genderappears under MuseBox Tasks → CPU Models. -
Add the nodes and connect them:
From Output To Input MuseBox Input → PC webcam WebcamMuseBox Operators → Scale (640 × 640) image inScale image outMuseBox Tasks → Face Analysis → Face Detection frameFace Detection face bounding boxMuseBox Tasks → CPU Models → age_gender frame / bounding boxFace Detection post processage_gender prev processingage_gender post processMuseBox Output → Image Rendering (input)
Instead of Sync Models you can use MuseBox Tasks → Custom → Custom Model and click its
Load manifest.json button to pick
~/musebox/musebox-compiler/examples/age_gender_tflite/age_gender/manifest.json
(C:\Users\<your-user>\musebox\musebox-compiler\examples\age_gender_tflite\age_gender\manifest.json on Windows). The node reads the model name and the
input size from it.
Option B: generate it with the compiler
Instead of building it by hand, mbx-compile can write the same pipeline for you:
On your PC:
pc$ mbx-compile pipeline age_gender --cascade face_detection --server ws://<board-ip>:8080 -o age_gender_cascaded_pipeline.json
[Success] Generated pipeline flow JSON: age_gender_cascaded_pipeline.json
  • Model: age_gender (Backend: tflite, Task: custom, Resolution: 62x62)
  • Server: ws://<board-ip>:8080
The file contains these nodes, already connected. The model is a Custom Model node, so you do not need Sync Models:
configuration (ws://<board-ip>:8080)
PC webcam ─► Scale 640×640 ─► Face Detection ─┬─ face bounding box ─► AI Model (age_gender) ─► Image Rendering
                                              └─ post process ──────►
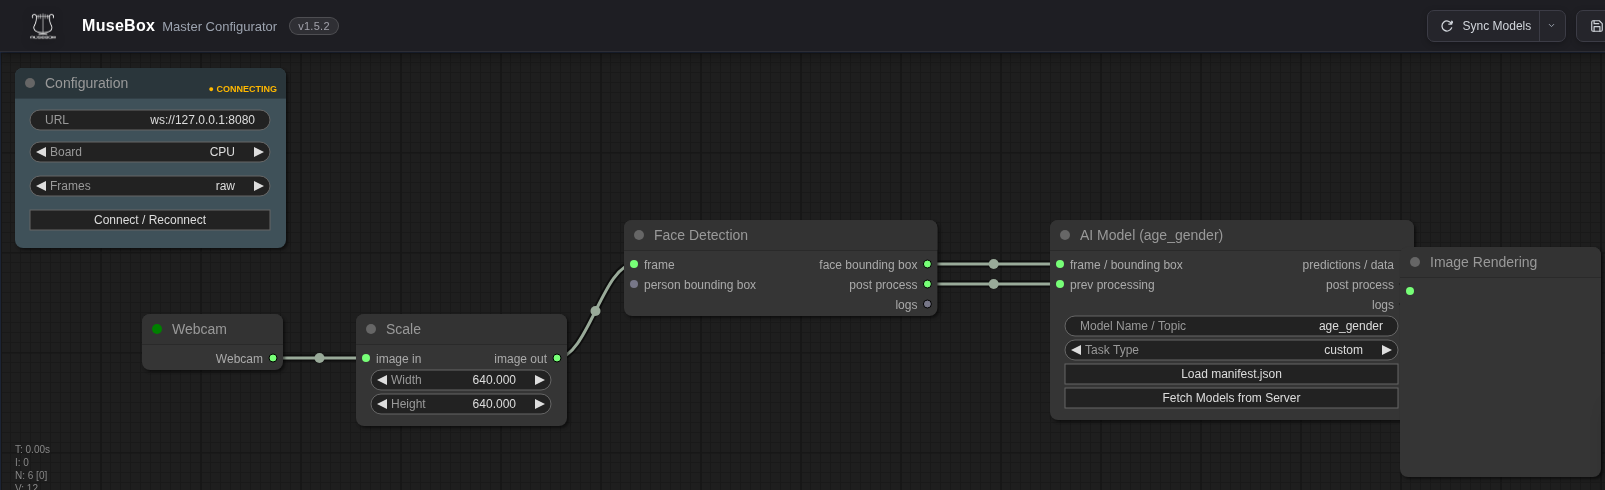
In the editor, load it with Manage → import, or run it directly with the client (step 7). Its
configuration node has Board CPU because age_gender is a TFLite model: Face Detection still runs on
the Hailo NPU.
7. Run it
In the editor, press Play. Each face in the Image Rendering node gets a box and a label such as
Age: 31 | Gender: male.
With the client:
On your PC, Linux / macOS:
pc$ cd ~/musebox/musebox-client/python
pc$ source .venv/bin/activate
pc$ python main.py --json ~/musebox/musebox-compiler/examples/age_gender_tflite/age_gender_cascaded_pipeline.json --url ws://<board-ip>:8080 --source 0
On your PC, Windows 10 / 11 (Command Prompt or PowerShell):
pc$ cd C:\Users\<your-user>\musebox\musebox-client\python
pc$ .venv\Scripts\activate
pc$ python main.py --json C:\Users\<your-user>\musebox\musebox-compiler\examples\age_gender_tflite\age_gender_cascaded_pipeline.json --url ws://<board-ip>:8080 --source 0
The window shows the webcam with the same Age: ... | Gender: ... label above each face. --url sets
the board's address: the file is the one of option B, or, if you built the pipeline in the editor
(option A), the finished copy that comes with the example, which points to ws://127.0.0.1:8080.
What the model returns
For each face, the reply's data field holds what postprocess.cpp returned:
{
  "status": "success",
  "topic": "age_gender",
  "data": {
    "task": "age_gender",
    "age": 31,
    "gender": "male",
    "gender_confidence": 0.8711,
    "custom_cpp": true,
    "input_meta": {"orig_w": 118, "orig_h": 140}
  },
  "execution_time": 2.1
}
| Field | Meaning |
|---|---|
age |
estimated age in years |
gender |
"female", "male", or "uncertain" when the two scores are too close |
gender_confidence |
score of the chosen gender |
input_meta |
size of the face image the model received |
Your own application can send a face image with the topic age_gender and read these fields
(chapter 5).
Using your own model
The same steps work for any .tflite or .onnx model that analyses a face, a person or an object:
mbx-compile inspect-cputo read its input and outputs.- A
postprocess.cppthat turns its outputs into the fields you want, unless one of the built-in tasks already fits. Apreprocess.cpponly if a plain resize is not enough. mbx-compile init,verify,package,deploy, then restart the AI server.mbx-compile pipeline --cascade face_detection, or connect the node after Face Detection in the editor.
After changing a .cpp file, run package and deploy again and restart the AI server: it recompiles
the changed file.